Chapter 13 · Part III, Projects: Beginner
Chapter 13: Replacing a Light Fixture
Quick answer
Replacing a ceiling or wall fixture is a 30–60 minute project for a standard light. Kill power at the breaker, three-test on the existing fixture wires, unscrew the old fixture and disconnect (black to black, white to white, ground to green/box), mount the new fixture's bracket, connect the new fixture's wires, secure to the bracket. Two critical checks before buying: weight (anything over 50 lbs requires a fan-rated box, see Ch 14), and wet/damp rating (for bathrooms over showers, or any outdoor location, the fixture must be rated for that condition).
Replacing a ceiling or wall light fixture is the next step up in DIY complexity. The wiring itself is no harder than a switch or receptacle, but you're working overhead, often on a ladder, with a fixture that has its own weight and mounting requirements. The mechanical part of the job is more involved than the electrical part.
This chapter covers replacing standard ceiling-mounted fixtures (flush-mount, semi-flush, pendant, chandelier) and wall-mounted fixtures (sconces, vanity lights). Ceiling fans get their own chapter (Chapter 14) because they require fan-rated boxes and additional structural support.
Estimated time: 30–60 minutes for a standard fixture. More for chandeliers or heavy fixtures.
Cost: Variable. Replacement fixtures range from $15 to several hundred dollars depending on style.
Permit required: Typically no for like-for-like replacement.
Before You Buy: Considerations for a New Fixture
Quick notes before we get into installation:
Weight. A standard ceiling box is rated for fixtures up to 50 lbs. Anything heavier requires a fan-rated box (see Chapter 14) or additional support. Check the fixture's weight before buying; if it's over 25 lbs, plan to use a fan-rated box even if it's not technically a fan.
Style of mount. Flush-mount sits directly against the ceiling. Semi-flush has a small drop. Pendants hang on a rod or chain. Chandeliers can be quite long. Make sure the mount style fits your space.
Wet vs dry vs damp rating. For bathrooms (over showers, tubs) and outdoor locations, the fixture needs to be rated for the conditions. Dry-rated fixtures are for normal indoor use. Damp-rated fixtures handle some moisture (covered porches, bathrooms but not over the shower). Wet-rated fixtures handle direct exposure to water (uncovered outdoor, over showers).
Bulb type. Modern fixtures often have integrated LED arrays (no replaceable bulbs); some still use standard bulb sockets (E26 medium base, E12 candelabra, etc.). Decide whether you want replaceable bulbs.
Junction box compatibility. Most fixtures mount to a standard 4" round or octagon ceiling box, with a "crossbar" (mounting bracket) that comes with the fixture. Some fancier fixtures need specific mounting hardware that includes its own bracket.
Smart fixtures. Some integrated LED fixtures have built-in smart features (color tuning, dimming, schedules). These have additional considerations: they need a neutral wire at the switch, they may need a specific dimmer or smart switch, and they may require a hub.
What You'll Need
Tools:
- Voltage tester (NCVT)
- Screwdrivers
- Pliers
- Wire nuts or Wago connectors
- Stepladder of appropriate height
- Phone for photos
Materials:
- The new fixture
- Wire nuts (yellow or red typically work for fixture wires; check fixture instructions)
- A helper for heavy fixtures
Step 1: Identify and Kill the Circuit
Same as before. Turn the wall switch on, find which breaker controls the light, kill it, tape the handle.
For ceiling fixtures, sometimes the fixture is wired through multiple switches (a switched outlet with a ceiling fan, for example) and you need to kill more than one circuit. For straight ceiling lights, one breaker is usually enough.
[Illustration showing the sequence: wall switch on → identify correct breaker at panel → kill breaker → tape handle, with arrows tracing the path from light fixture back to panel]
Step 2: Three-Test Verify
Standard procedure. NCVT on a known-live source, on the wires inside the fixture (after you partially remove it; see step 3), on the known-live source again.
A note on testing fixtures: because the wires are usually accessed by removing the fixture itself, you may have to do a partial removal before you can test the wires. Lower the fixture (don't fully remove yet, just unscrew it from the box), expose the wires, and test there. Verify dead before disconnecting anything.
Step 3: Remove the Old Fixture
Use a stepladder of appropriate height. Don't reach overhead from a chair or stack of boxes. Get a real ladder. The ladder height should let you reach the fixture comfortably with both hands, with the ladder's center of gravity directly under the work.
Have a helper if the fixture is heavy. Anything over about 15 lbs should have someone supporting it while you disconnect. Letting a fixture fall on you because you didn't ask for help is a common injury.
Remove the canopy or cover. Most ceiling fixtures have a "canopy," a decorative dome that covers the box and mounting hardware. Loosen the screw or thumbnut holding it and slide it down.
Unscrew the fixture from the box. Most fixtures have two screws holding them to the crossbar (the metal bracket that mounts to the box). Some have a center stem with a nut.
Carefully lower the fixture. As you lower it, the wires come into view. Don't yank.
Test wires for voltage one more time before disconnecting. Make sure dead.
Disconnect. Wire nuts come off easily by twisting counter-clockwise. Disconnect the fixture's black wire from the cable's black wire, the white from white, and the bare ground from the green or bare ground wire.
Set the old fixture aside.
Step 4: Inspect the Box and Wiring
Now's the time to assess what you're working with.
[Illustration showing a typical ceiling box from below with annotations: box type (metal vs plastic), mounting integrity, available wires (hot/neutral/ground), mounting hardware type (crossbar, holes, center stud), and weight rating label location]
Box type. Look at the box. Is it metal or plastic? Is it labeled with weight rating (some are)? Round or octagonal? About 4" in diameter is standard.
Box condition. Is the box securely mounted to a joist or beam? Push gently on the box from below. If it moves significantly, it's not properly secured. This is a problem you'll need to address before installing the new fixture.
Wires available. You should have:
- A black hot wire (or a re-marked white hot wire if the box was originally a switched lamp without a neutral)
- A white neutral wire
- A bare or green ground wire
If you only have a hot and a return (the older switch loop without neutral), and the new fixture needs a neutral, you have a problem. Most "dumb" fixtures don't need a neutral at the box; the switch interrupts the hot, and the neutral is fed directly from the panel. But some smart fixtures, certain LED fixtures, and any motorized fixtures (like ceiling fans with integrated lights) need a true neutral at the fixture.
Mounting hardware. Most ceiling boxes have either:
- A crossbar already attached
- Holes where a crossbar can be screwed in
- A center stud (threaded post) for stem-mount fixtures
The new fixture's mounting hardware should match. If your fixture comes with a crossbar but your box doesn't accept that style of mount, you may need an adapter or a different fixture.
Box weight rating. A standard ceiling box without a fan/heavy-fixture rating is good for up to 50 lbs (NEC 314.27). Most decorative ceiling lights are well under this. If your fixture is over 25 lbs, consider whether the existing box is up to the job. If it's 50+ lbs, you definitely need a fan-rated box.
Step 5: Install the New Fixture
Read the fixture's instructions. Each manufacturer has slightly different procedures. Spend two minutes reading.
Attach the crossbar (if needed). If your fixture comes with a new crossbar, screw it to the box in place of any existing one.
[Side-by-side illustration of the three mounting styles: (1) crossbar with two screws into box ears, (2) crossbar with center stud and threaded nipple, (3) direct-to-stud stem mount, with a typical fixture canopy shown attaching to each]
Connect the ground first. Take the bare or green ground wire from the cable, connect it to the green ground screw on the crossbar (or to the bare/green ground wire from the fixture, using a wire nut). Some fixtures have both: a ground screw on the crossbar and a green wire on the fixture; both should be connected.
Connect the neutral. White cable wire to the white fixture wire. Strip ends to about 1/2" if needed. Use a yellow wire nut for two 14 AWG wires (or larger nut size for thicker wires). Twist the wires together first (clockwise, to about 1.5 turns), then thread the wire nut on and tighten until it bottoms out. Tug-test.
Connect the hot. Black cable wire to the black fixture wire (or the wire labeled "hot" or marked with a stripe). Same procedure: twist together, wire nut, tug-test.
Some fixtures have additional wires:
- Multi-bulb fixtures with separate switching: may have multiple hot wires for different bulb groups. Match each to the correct switched hot from the cable, or combine them if they're switched together.
- Smart/dimmable fixtures: may have a neutral wire that connects to the cable's neutral, plus the hot. Read the instructions.
- Pendants on long stems: the wires in the stem connect inside the canopy.
Tuck wires into the box. Once all connections are made, gently push the wire nuts and connections up into the ceiling box. The fixture's mounting plate or canopy should sit flush against the ceiling without any wires pinched.
Mount the fixture to the crossbar. Screws or nuts (depending on the design). Don't overtighten; the fixture's metal plate can warp.
Install bulbs (if separate from the fixture).
Install the canopy or cover. Slide it up against the ceiling and tighten the retaining screws or nuts.
Step 6: Test
- Restore power at the breaker.
- Flip the wall switch. The light should turn on.
- Flip the switch off. The light should turn off.
- For dimmable LEDs or smart fixtures: test the dimming function or smart features per the manufacturer's procedure.
- Visually check that the fixture is level and securely mounted. No sag, no gap between the canopy and ceiling.
If the light doesn't come on:
- Verify the breaker is actually back on.
- Check that the switch is on.
- Re-verify the wire connections (with power off and three-test verified).
- For LED-integrated fixtures, the LED driver may have failed in shipping (rare but happens; replace the fixture).
If the light flickers:
- Loose connection somewhere; re-check connections.
- LED-dimmer compatibility issue (if the fixture is dimmable and on a dimmer).
- A faulty driver in the LED fixture itself.
Special Cases
Heavy Chandeliers (Over 25 lbs)
For a heavy chandelier, you need either:
- A fan-rated ceiling box (rated for 70+ lbs)
- A heavy-duty support brace installed in the ceiling cavity
- A direct-to-joist mounting solution
Don't hang a heavy chandelier from a standard plastic ceiling box. The plastic boxes are typically rated for 50 lbs, but the screws holding them to the joist can pull out under sustained load, especially with vibration or accidental bumps.
For chandeliers in the 25–50 lb range, replacing the existing box with a fan-rated box (which clamps directly to a joist) is the right move. We cover this in Chapter 14.
For chandeliers over 50 lbs, the support situation needs proper engineering. Consider hiring out the install or, at minimum, having a structural support installed before mounting.
Bathroom Vanity Lights
Same procedure as a wall sconce. The catch: the box must be rated for damp locations (bathrooms count, even though they're not technically "wet"). Most modern boxes are; older ones may not be.
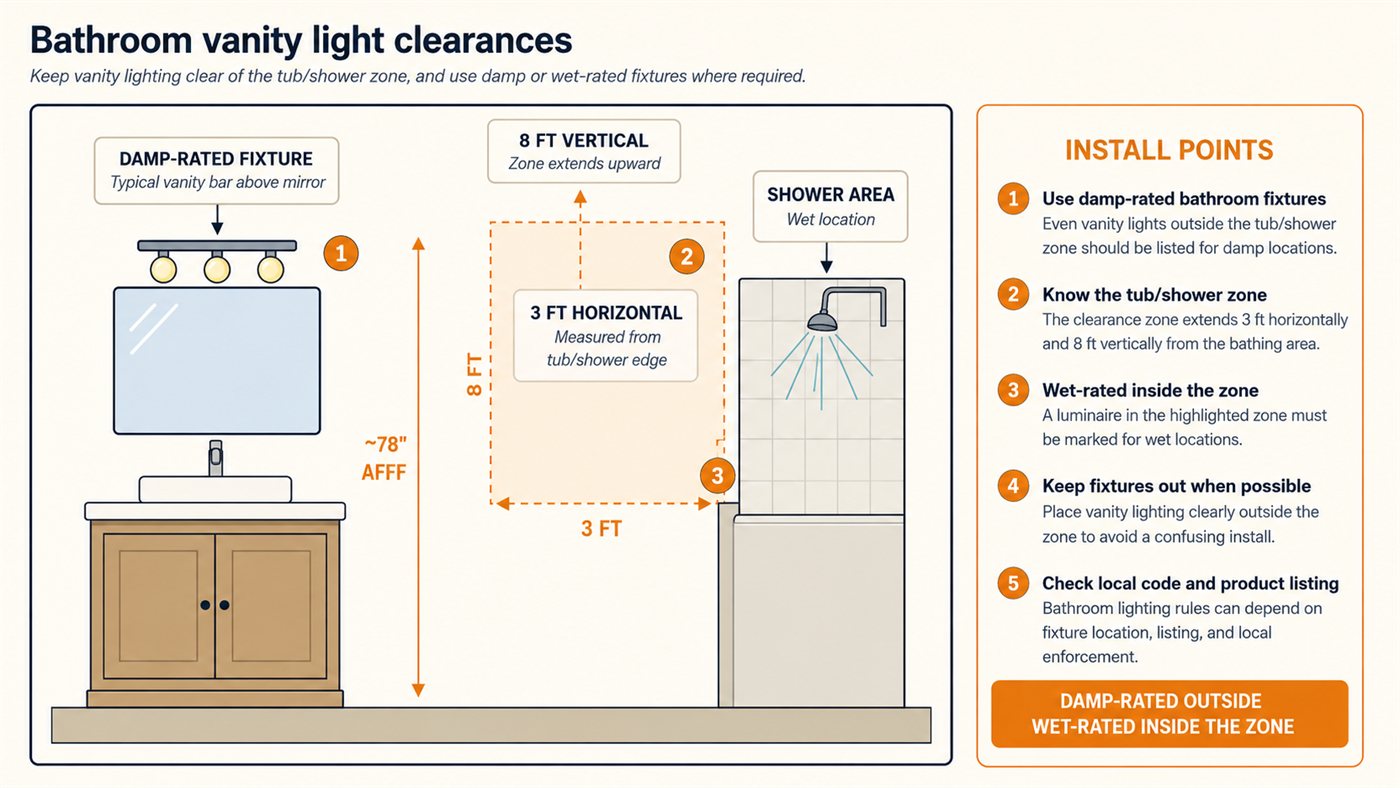
[Illustration of a bathroom vanity area showing required clearances from the sink and shower, damp-location box requirements, and the position of a typical vanity bar fixture above a mirror]
If the existing fixture is on a switched circuit shared with the bathroom outlet (common in older homes), be aware that under modern code, the bathroom outlet circuit must be a dedicated 20A. If you're doing a renovation, this might be the time to separate them.
Outdoor Wall Lights
The fixture must be rated for wet or damp location (whichever applies). The box must be a weather-resistant exterior box. The wiring entering must be properly weatherproofed (gasket between fixture and wall, sealing as needed).
We cover outdoor electrical in detail in Chapter 19.
Recessed (Can) Lights
Recessed lights are different beasts. They're not really "fixtures mounted to a box"; they're "fixtures that contain their own integral box." Replacing one usually means swapping the entire can plus trim plus bulb (or the modern equivalent: a direct-mount LED disc that doesn't need a can at all).
For DIY purposes, the easiest recessed light upgrade in an older home is replacing the bulb-and-trim with an integrated LED disc light. These mount directly to the existing can's housing (or, in some cases, replace the entire can with a thin housing-less LED). They're 4–6 inches in diameter, run 9–15W LED equivalent, and last 25,000+ hours.
The procedure for these LED disc retrofits:
- Kill power and verify dead.
- Remove the existing bulb and trim.
- Connect the disc light's pigtail to the can's E26 socket adapter (most discs come with one).
- Push the disc up into the can; spring clips hold it in place.
- Restore power and test.
Total time: 5–10 minutes per light. Cost: $10–25 per disc. Excellent ROI in older homes with halogen or incandescent recessed lights.
Box Issues to Watch For
When you remove the old fixture and inspect the box, a few things should make you pause.
Box is loose. It moves visibly when pushed. The screws have backed out, or the box was never properly secured to a joist. You'll need to remount before installing the new fixture. Often this means swapping for a fan-rated brace box (Chapter 14) that clamps to the joists from inside the cavity.
Box is the wrong type. A "pancake" box (very shallow, used in some older surface-mount installations) won't fit modern fixtures with deeper canopies. Replace with a deeper box.
Box is plastic and the new fixture is heavy. Plastic boxes are rated for 50 lbs. If your fixture is approaching that limit, consider upgrading to a metal box or a fan-rated brace box.
Box has too many wires already. Box fill (from Chapter 8) might be exceeded if you've got multiple cables in a small box. Sometimes the existing fixture worked because the previous installer crammed everything in; doesn't mean it was right. Larger box might be needed.
Old box is rusted or cracked. Replace it.
These aren't reasons to abandon the project. They're reasons to plan an extra step.
Wire Color Variations on Fixtures
Most fixtures use a standard color code (black hot, white neutral, green or bare ground). Some don't.
Lamp cord style fixtures (older or imported) sometimes use:
- Two black wires (or two clear wires), with one identified by a ridge or stripe on the insulation. The ridged or striped one is the neutral; the smooth one is the hot.
- Two black wires with one labeled (with a small printed tag or cardboard insert).
- Generic-colored wires that you have to identify by tracing back to the source: the wire connected to the threaded socket shell is the neutral; the wire connected to the small contact at the bottom of the socket is the hot.
If you encounter unfamiliar wire identification:
- Read the fixture's installation instructions for guidance.
- If unclear, use a multimeter set to continuity mode to trace which wire connects to the socket shell vs the bottom contact.
- The shell-side wire goes to the cable's neutral (white).
- The contact-side wire goes to the cable's hot (black).
[Cutaway illustration of a standard E26 lamp socket showing the threaded shell and the bottom contact, with arrows labeling which wire is neutral (shell) and which is hot (contact), plus examples of ridged/striped insulation identification]
Getting this backwards on a lamp will work (the bulb still lights), but it means the bulb's metal threads are energized when the lamp is on, which is a minor shock hazard if someone touches the threads while changing a bulb. Get it right.
Disposing of the Old Fixture
Quick note: if the old fixture has compact fluorescent bulbs (CFLs), they contain a small amount of mercury and shouldn't go in regular trash. Most cities have hazardous waste collection days; some hardware stores (Home Depot, Lowe's) accept CFLs for recycling.
LED bulbs and incandescent bulbs can go in regular trash, though some recycling programs accept them.
The fixture itself (metal and plastic) can be disposed of as scrap or trash, depending on your municipality. If the fixture is in good condition, consider donating it; Habitat for Humanity ReStore (which has OKC metro locations) accepts working light fixtures.
SPARK SHARK SIDE NOTE
Working overhead is harder on your body than you think. After your second or third ceiling fixture replacement, your neck will ache and your shoulders will burn. Take breaks, drink water, and don't push through fatigue. A tired DIYer makes mistakes. Schedule fixture-heavy projects for early in the day, not after you've already done other physical work. Your future self thanks you.
What's Next
You've now done the most common indoor fixture replacement. Chapter 14 covers the specific case of ceiling fans, which require additional structural considerations. Chapter 15 covers USB outlet retrofits, a popular small project that's a good intro to working with combination devices.
After that, we move into Part IV (Intermediate Projects) where the projects get more involved: extending circuits, running new circuits, installing exhaust fans, outdoor electrical, and hardwiring appliances.
FAQ
- What if there's no ground wire in the box?
- Common in pre-1965 homes. NEC allows you to install a fixture without ground IF the fixture is double-insulated (most modern fixtures are, check the label). Otherwise, code requires either a real ground run to the box or upgrading the circuit's protection (see Chapter 12 on GFCI/no-ground upgrades).
- How heavy can a standard ceiling box support?
- Standard ceiling boxes are rated for fixtures up to 50 lbs. Anything heavier needs a fan-rated box (which can typically handle 70 lbs). If you're hanging a big chandelier or oversized pendant, plan to upgrade the box before mounting.
- My new fixture has different wire colors than my house. Now what?
- Modern fixture wires use white/clear (neutral) and ribbed-or-marked (hot). Match function: white-to-white, marked-to-black. If the fixture has a green ground wire, connect it to the house ground or the metal box (with a green ground screw). When in doubt, follow the fixture's installation diagram, not the wire colors alone.