Chapter 27 · Part V, Projects: Advanced
Chapter 27: Solar and Battery Systems
Quick answer
Solar PV and battery storage are the highest-value, longest-investment electrical projects most homeowners consider. They're also the projects with the strongest case for professional installation. Why: structural engineering (roof load), electrical engineering (system sizing, interconnection, PV-rated equipment), specialized training, ongoing utility coordination, and manufacturer warranties that almost universally require certified installation. This chapter prepares you to evaluate professional offerings rather than walk through DIY install. Federal tax credits and net-metering rules vary; verify current incentives before committing.
BEFORE YOU START THIS CHAPTER
The work in this chapter carries materially more risk than anything in Parts III and IV. The specific risks of solar and battery systems include parallel energy source that does not de-energize when the main is opened; utility interconnection paperwork and inspection; battery storage hazards (thermal runaway, lithium fire characteristics); federal tax-credit eligibility tied to certified installation; and manufacturer-warranty voidance for self-installation on most major brands.
Permit and inspection are required in essentially all OKC-metro jurisdictions for the work in this chapter, regardless of the homeowner exemption. Do not begin without a permit on file.
If you haven't worked through Parts I and II yet, do that first, the diagnostic and code references you'll need are there.
Do not attempt the procedures in this chapter if any of the following apply to your home: aluminum branch circuit wiring (typically 1965–1972 construction); knob-and-tube wiring; a panel brand with documented failure-rate issues (Federal Pacific Stab-Lok, Zinsco, certain Challenger panels, none of these were formally recalled by the CPSC, but independent testing and industry consensus identify them as unsafe to add load to); evidence of prior unpermitted electrical work you cannot identify the scope of; water damage, rodent damage, or burn damage in or near the work area; or any condition that does not match what this chapter describes. In any of these cases, hire a licensed electrician.
If anything goes off-script, wiring you don't recognize, a step that doesn't match the procedure, or your gut saying "this isn't right", stop, leave it de-energized with conductors capped, and call. We do mid-project rescue work every day.
Proceeding past this notice reaffirms the assumption of risk and release in the front matter.
Solar power and battery storage are the highest-value, longest-investment electrical projects most homeowners will consider. They're also the projects with the most code complexity, the strongest case for professional installation, and the largest variation in quality between installers.
This chapter is more conceptual than step-by-step. The work itself is genuinely a professional project for almost everyone. What we'll cover here is what you need to know to be an informed customer, evaluate proposals, and understand what's being installed in your home.
Estimated time: 2–5 days for professional installation. Cost: $15,000–50,000+ for solar; $10,000–25,000 for battery; substantial federal and state incentives apply. Permit required: yes, with multiple inspections and utility interconnection requirements.
Strong pro-call nudge: Solar and battery systems require structural engineering (roof load), electrical engineering (system sizing, interconnection), specialized installation training, and ongoing utility coordination. Manufacturer warranties almost universally require certified installation. The DIY path here is impractical for the vast majority of homeowners. This chapter prepares you to evaluate professional offerings.
Solar System Components
A residential solar system consists of:
Solar panels (PV modules). The visible part. Convert sunlight to DC electricity. Modern residential panels are typically 350–450W each, in 60–72 cell configurations.
Inverters. Convert DC from panels to AC for use in the house. Two main approaches:
- String inverters: one large inverter for the whole array. Cheaper, but if shaded, the whole string under-performs.
- Microinverters: small inverter per panel. More expensive, but each panel performs independently. Better for homes with partial shading.
Some systems use power optimizers with a string inverter as a middle-ground.
Mounting hardware. The racking that holds panels to the roof (or to a ground-mount structure). Specific to roof type (asphalt shingle, tile, metal, etc.).
DC and AC disconnects. Required by code for emergency shutoff. The "Rapid Shutdown" capability (NEC 690.12) is required for new residential PV systems.
Net meter or bidirectional meter. Replaces (or supplements) the standard utility meter. Measures both consumption and back-feed to the grid.
Combiner box / junction box. Where DC strings combine before reaching the inverter.
For a typical 8 kW residential system: 20–25 panels, mounting hardware, microinverters or string inverter+optimizers, AC and DC disconnects, monitoring equipment, and interconnection components.
Battery Storage Components
A residential battery system adds:
Battery modules. The actual storage. Common chemistries:
| Chemistry | Properties | Common in |
|---|---|---|
| Lithium iron phosphate (LFP) | Safer, more cycles, lower energy density | Newer systems |
| Lithium nickel manganese cobalt (NMC) | Higher energy density, fewer cycles | Older Tesla Powerwalls |
Common residential capacities: 10 kWh, 13.5 kWh, 20 kWh, or scalable systems.
Battery inverter / hybrid inverter. Converts between battery DC and AC for the house. Some systems combine solar and battery in one "hybrid inverter."
Backup interface (gateway / interconnect). Manages the home's electrical system during outages, separating critical loads from non-critical, coordinating between solar, battery, and grid.
Critical loads panel. A sub-panel containing only the circuits that should run during outages (refrigerator, lights, some outlets, possibly HVAC). Non-critical loads stay on the main panel and don't draw from the battery during outages.
Choosing a Solar Installer
For most homeowners, this is the most important decision in the project.
Things to verify:
- North American Board of Certified Energy Practitioners (NABCEP) certification for at least the lead installer
- Oklahoma electrical contractor license
- Manufacturer certifications for the equipment they're installing
- Insurance (general liability, workers' comp)
- Bond if working in jurisdictions that require it
- Years in business (look for 5+ years; many fly-by-night solar companies appear and disappear)
Get multiple bids. 3–5 is typical for solar. Compare:
- System size (kW DC and kW AC)
- Number and brand of panels
- Inverter type and brand
- Production estimate (annual kWh)
- Total cost before and after incentives
- Warranty terms (panels: 25 years; inverters: 10–12 years for string, 25 years for microinverter; workmanship: 10+ years from installer)
- Monitoring system included or extra
- Battery option (price separately)
Watch for red flags:
- Pressure tactics ("price expires in 24 hours")
- Unrealistic production claims
- "Free solar" offers (these are usually leases or PPAs that may save money but transfer ownership)
- Lack of detailed proposal
Lease vs purchase vs PPA:
- Outright purchase (cash or financed): you own the system, get all tax benefits, maximum long-term value.
- Lease: you pay a fixed monthly amount; the leasing company owns the panels.
- Power Purchase Agreement (PPA): you pay for the power produced; the company owns the panels.
For most homeowners, outright purchase (cash or solar-specific loan) provides the best long-term value. Leases and PPAs are simpler but the savings are smaller.
Federal and State Incentives
As of 2026, federal incentives include:
Federal Solar Investment Tax Credit (ITC): 30% of total system cost, claimed against your federal income tax. Available through at least 2032 (current law). Reduces system cost significantly.
Federal battery storage tax credit: 30% on qualifying battery systems (since 2023, batteries are eligible standalone, not just paired with solar).
State and local incentives: Oklahoma doesn't have major state-level solar incentives at the time of writing, but check for current programs. Some utilities offer rebates or special net metering rates.
Net metering: OG&E and PSO offer net metering for residential solar customers. Excess production gets credited back to your account. The specific terms (full retail credit vs lower wholesale rate) affect ROI significantly.
For a $25,000 solar system: $7,500 federal tax credit reduces effective cost to $17,500. This is a key factor in payback calculations.
Sizing the System
System size depends on:
- Annual electricity usage (in kWh; check your utility bills for the past 12 months)
- Roof orientation and shading
- Available roof area
- Goals (offset 50% of usage? 100%? More?)
A typical OKC home using 1,000 kWh/month:
- 100% offset target: about 8 kW DC system, 20–24 panels
- Roof area required: about 500–600 sq ft of unshaded south-facing roof
If your roof is unshaded south-facing, sizing is straightforward. If your roof has complications (shading, multiple orientations, complex shapes), sizing requires expertise.
Don't oversize. The marginal panel beyond what offsets your usage is much less valuable (if net metering pays full retail) or has minimal value (if net metering pays wholesale).
Battery Sizing
Battery size depends on goals:
- Whole-home backup during outages: match battery capacity to expected outage duration and home's daily load. For a typical OKC home (30 kWh/day), 13–30 kWh of battery covers 12–24 hours.
- Critical loads only during outages: smaller battery sufficient. 10–13 kWh handles refrigerator, some lights, internet, and HVAC for 12–24 hours.
- Self-consumption (no outage backup): size battery to store excess solar production for evening use. Often 10–20 kWh.
- Time-of-use rate optimization: size to shift consumption from peak to off-peak hours. Smaller battery may be sufficient.
For most homeowners interested in battery storage, the primary motivation is outage resilience. OKC's weather makes this a real value. A 13–20 kWh battery is the practical target for most homes.
The Installation Process
A typical solar+battery install:
Day 0–30: Design and engineering.
- Initial consultation, site visit, roof inspection
- System design and proposal
- Contract signing
- Permit application
- Utility interconnection application
Day 30–90: Permitting and ordering.
- Permit approval (varies by jurisdiction)
- Equipment ordering
- Sometimes structural engineering review
Day 90–120: Installation.
- 1–3 days for solar mounting and wiring
- Additional 1–2 days for battery installation
- Inverter, monitoring, and disconnect installation
Day 120–150: Inspection and interconnection.
- Local building inspector visit
- Utility interconnection inspection
- Permission to operate (PTO) granted by utility
- System turned on
Total timeline: 3–5 months for solar; 4–6 months for solar+battery.
Interconnection: How Solar Talks to the Grid
Net-metered solar systems are "grid-tied": they feed excess production back to the utility, drawing from the utility when production is insufficient.
The interconnection agreement is a contract between you and the utility specifying:
- The size of your system
- How excess production is credited
- Safety requirements (anti-islanding, automatic disconnect during grid outages)
- Inspection and approval requirements
Most utilities require:
- A bidirectional meter (replaces standard meter)
- Compliant inverter with anti-islanding protection
- Visible disconnect switch accessible to utility workers
The utility approval process typically adds 2–4 weeks to the project timeline. Your installer handles the paperwork.
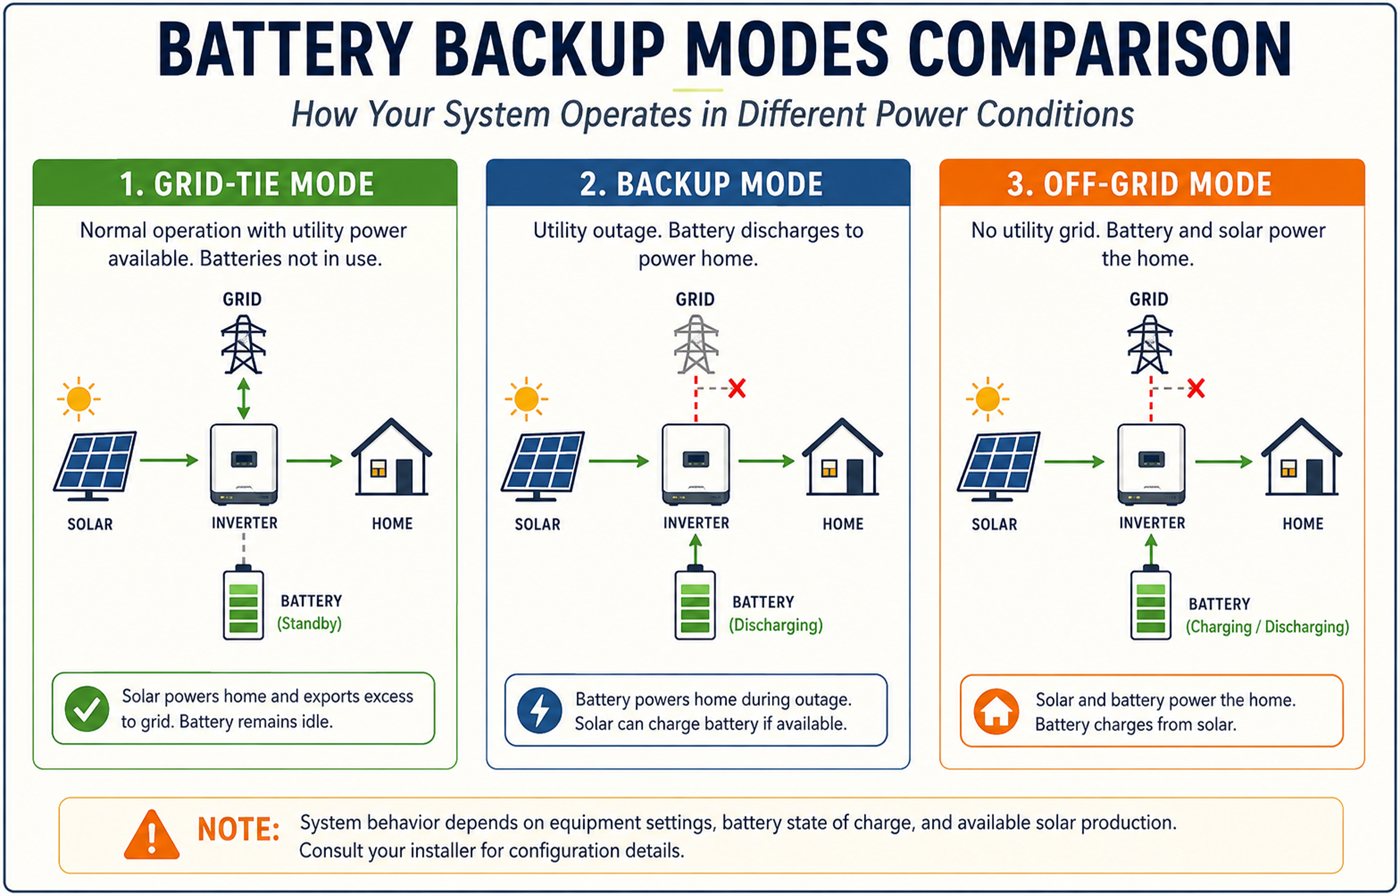
Battery Backup Modes
Battery systems can operate in several modes:
Self-consumption (no backup): battery charges from solar during the day, discharges in the evening. Reduces grid imports. Doesn't help during outages.
Backup-ready: battery is held at high charge, ready for outage. Day-to-day, it self-consumes only minimally.
Time-of-use optimization: battery charges when rates are low, discharges when rates are high.
Off-grid: the system operates independently of the utility. Requires very large battery and additional equipment. Rare for typical residential.
Most residential systems operate in a hybrid mode that prioritizes self-consumption while maintaining a reserve for outage backup.
Costs and Payback
Rough numbers for a typical OKC home:
| Configuration | Gross cost | After 30% federal credit | Annual savings | Simple payback |
|---|---|---|---|---|
| Solar only (8 kW) | $20,000–28,000 | $14,000–19,600 | $1,200–1,600 | 9–15 years |
| Battery only (13 kWh) | $12,000–18,000 | $8,400–12,600 | Small (mostly self-consumption) | Backup value subjective |
| Solar + battery (8 kW + 13 kWh) | $32,000–44,000 | $22,400–30,800 | Solar savings + backup | Combined math |
25-year cumulative savings (solar only): $25,000–40,000+.
These are rough numbers. Get specific quotes for your situation. The math depends heavily on:
- Your current electricity costs
- Net metering terms with your utility
- Available incentives
- Financing terms (cash vs loan)
- Future electricity rates (typically rising)
Long-Term Considerations
A few things to think about:
Roof replacement. Solar panels typically last 25+ years. Asphalt shingle roofs typically last 20–25 years. If your roof is older than 10 years, consider replacing it BEFORE solar installation. Otherwise, you'll be removing and reinstalling panels in 10–15 years to replace the roof, adding $3,000–5,000 to the cost.
Inverter replacement. String inverters typically last 10–15 years. Microinverters typically last 25 years. Plan for inverter replacement at some point.
Battery replacement. Lithium batteries degrade. Most warranties guarantee 70–80% capacity at 10 years. Plan for battery replacement around year 15–20.
Selling the home. Studies show solar adds value to home sales, but the value depends on whether the system is owned (yes) or leased (often no, and can complicate sales).
Future expansion. Modern systems are often modular. You can add panels or battery capacity later if needs change.
Common Mistakes (Working with Installers)
Choosing solely on price. The cheapest installer is often the cheapest for a reason. Quality of materials, installation, and warranty support varies dramatically.
Not understanding the warranty. "25-year warranty" might cover only the panel itself, not the labor to replace it. Read the fine print.
Believing optimistic production estimates. Some installers use idealized models. Get realistic estimates based on your specific roof's shading and orientation.
Skipping the home assessment. A reputable installer will visit your home, inspect the roof and panel, and design a system specific to your situation. Beware of "online quotes" without site visits.
Ignoring the financing terms. Solar loans vary widely in interest rates and terms. A high-interest "solar loan" can wipe out savings.
What's Next
Part V is complete. You've covered the entire range of residential electrical projects from basic device replacement (Part III) through the most complex installations (panel replacement, solar/battery systems). The skills built in early chapters underpin all of this; the advanced projects just have more scope and consequence.
Part VI starts the troubleshooting section: when something goes wrong, how do you diagnose it? Chapter 28 covers the diagnostic mindset, then we cover specific failure categories: breakers (Ch 29), lights (Ch 30), outlets (Ch 31), and whole-house issues (Ch 32).
Part VII (Chapters 33–37) closes the book with reference materials: wire and breaker tables, NEC quick-reference, shopping lists, glossary, and a final chapter on knowing when to call us.
SPARK SHARK SIDE NOTE
Solar and battery are the projects where the financial math, the technology, the contractor selection, and the long-term ownership decisions all come together. Take your time on these. Get multiple quotes, talk to recent customers of installers you're considering, run the numbers, and don't let urgency drive a bad decision. Solar is a 25-year investment; spend a few months getting it right. We've seen homeowners save thousands over their system's lifetime by choosing the right installer over the cheapest one.
PART VI
Troubleshooting
When things stop working: how to think like a diagnostician. Breakers, lights, outlets, and whole-house problems, walked through systematically.
Chapters 28–32
In this part:
- 28 The Diagnostic Mindset
- 29 Breakers That Trip (and Won't Reset)
- 30 Lights That Flicker, Buzz, or Burn Out Fast
- 31 Outlets That Don't Work
- 32 Whole-House Issues
BEFORE YOU START TROUBLESHOOTING
A different mindset for a different kind of work
The chapters in Parts III–V were about adding things, new outlets, new circuits, new equipment. Troubleshooting is about figuring out why something that used to work, doesn't anymore. That is a thinking job more than a doing job, and the habits that make you good at it are different from the habits that make you good at installation work.
Before you open the first box or pull the first device:
- Know what you're measuring before you measure it. If you don't know what voltage you expect to read, your meter is just a beeping rectangle.
- Stay non-contact until you have a reason not to. A non-contact tester finds 90% of "is this hot?" answers without ever touching a conductor.
- Document as you go. You will forget what was dead and what was alive ten minutes from now. Write it down.
- Energized work is allowed for testing, not for repair. Verify voltage with the panel live, then de-energize before you change anything.
If at any point the symptoms don't match what the chapter describes, the meter reads something you can't explain, or you find yourself opening drywall to keep going: stop, leave the work in a safe state, and call a licensed electrician. Part VI's purpose is to make you a better diagnostician, not to push you past what you should be doing.
CODE CURRENCY, VERIFY BEFORE YOU WORK
This edition reflects the 2023 National Electrical Code, the Oklahoma Electrical License Act as in effect on [date of first printing], and Oklahoma City permitting procedures as in effect on the same date. Codes update on a three-year cycle. State law can change at any legislative session. Permit fees, phone numbers, office hours, and inspection scheduling change without notice.
Before you start any project in this book, verify three things:
- Which NEC edition is currently adopted in your jurisdiction (call your local building department).
- Whether the homeowner exemption still applies to your specific situation (Oklahoma Construction Industries Board, or an attorney).
- Whether your project requires a permit and inspection in your jurisdiction, and what the current fee is.
Updates and corrections, where available, are posted at SparkShark.com/handbook-updates.
FAQ
- Should I DIY solar?
- No, for almost everyone. The DIY path here is impractical because of the engineering, manufacturer warranty requirements, federal tax credit eligibility (typically requires certified install), and utility interconnection paperwork. Even competent DIYers who could physically do the work would lose out on warranties and tax credits worth more than the labor savings.
- How does net metering work in Oklahoma?
- Oklahoma allows net metering for residential solar, your meter spins backward when you produce more than you consume. The specifics (credit rates, settlement periods, system size limits) depend on your utility and the current OCC rules. Verify with OG&E or your specific utility before sizing a system.
- What's the typical payback period?
- For solar in Oklahoma, typically 8–14 years after federal tax credits (which were 30% at first printing of this book, verify current rates). Battery storage payback is longer and more variable; batteries primarily provide outage resilience, not pure economic payback.